 |
| Folded Bark Baskets |
Folded bark baskets are strong and easy to make. They can be made from a variety of trees that have an inner bark that can fold without breaking, which includes cedars, spruces, tulip poplars, and others.
The first step is to find an appropriate tree. It has to be relatively young (around 8-10 inches in diameter), and have a large enough section without branches or holes in the bark.
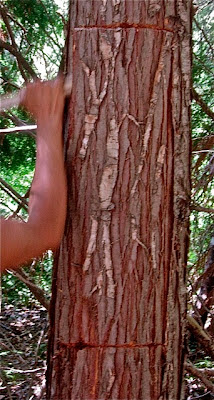 |
| Scored bark |
If you can find a tree that was recently blown or chopped down it's highly preferable you use it if the bark is still fresh enough that it can be peeled off. Otherwise, you'll have to get the bark from a live tree. If you do it properly you won't kill the tree by taking some of its bark. It's very important not to girdle the tree (i.e., it's very important not to take cut the bark all the way around the tree). Instead, never take more than a third of the circumference of the bark.
It's preferable to take the bark from the south-facing side of a tree on a dry day so that the tree can dry and heal itself before it's attacked by pathogens.
There's a fairly short window of opportunity to get the bark off a tree, in the spring, as the sap starts flowing and the bark can be peeled off easily. You may need to check it every couple of days to know when the tree is ready to let go of its clothing.
The baskets I like to use are generally 12-13 inches tall and 8-9 inches wide so you need to find a good section of that width and 24-26 inches long for the whole pattern to be extracted from the tree in one piece.
Draw your pattern on the bark with a knife. You can then cut your pattern with a knife as well but I find that it's easy to slip and mess up that way so I prefer using an axe. Place the axe on the line you drew and then use a big stick to pound on the neck of the axe. The goal is to cut all the way through the outer and inner barks without damaging the actual living wood.
Once you've gone all the way around, use a beveled stick to pry a side of the bark off the tree. Then, gently and slowly push the bark off the tree from one side to the other, making sure the bark comes off in one piece without breaking.
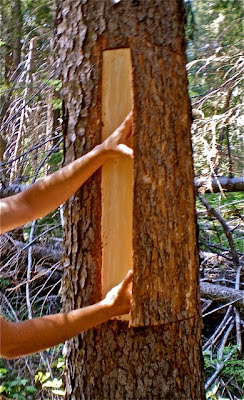 |
| Getting the bark off the tree |
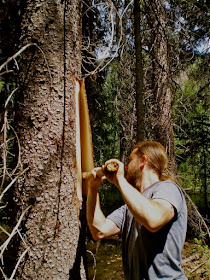 |
| Prying off the bark with a beveled stick |
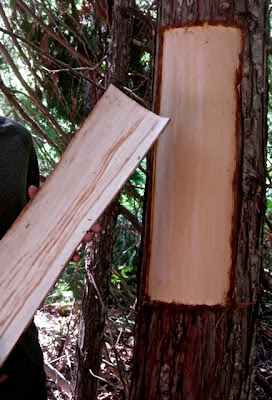 |
| A clean wound and a perfect slab of bark! |
If you're ready to get started on your basket immediately the bark may be pliable enough to go ahead. Otherwise, you may have to soak the bark in a stream or a tub of water until it's soft enough. The longer the bark has had time to dry, the longer it will have to be soaked. If you're just gathering materials for later, dry the bark in the shade so that it doesn't split. Then, when you're ready to use it, soak the bark in a tub of water from 24 to 48 hours (warm water will make it go a little faster).
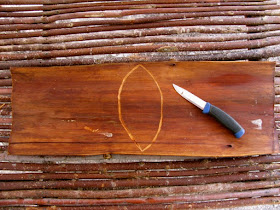 |
| Scoring the eye at the bottom of the basket |
At that point, make sure the bark is a good rectangle. You may have to do a little trimming to make it so. Measure the middle of the length and draw a line across the width. Then, draw an oval/eye shape around that line.
The total width of the eye should be around 4 inches. The corners of the eye should meet about a 1/4 inch from the edge of the bark.
With a sharp knife, score a V-shaped groove into most of the inner bark (not all the way through!).
 | |||
| The sides are folded along the grooves |
You can then gently fold each side along the grooves. If you scored the eye shape correctly, the bottom of the basket will naturally take its U shape.
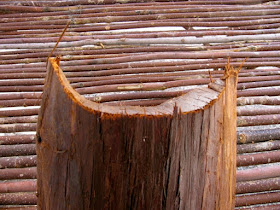 |
| U-shaped bottom |
Next you need to drill holes on the edge of the bark where the two sides will be stitched together. If you have a hand drill it may be a good tool to use and get nice clean holes. Considering that I broke mine and that I've been too laz... I mean busy to make a new one I just use an awl. The problem with the awl is that it has a tendency to split the bark. Working around that is pretty easy though. Just offset the holes sightly so that they don't line up in a perfect line. That way, even though each hole will create a small split, these splits won't meet together and ruin your basket.
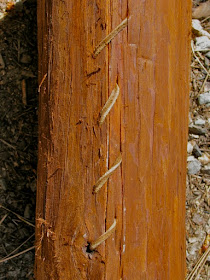 |
| Buckskin stitches. Note how the holes don't line up to minimize splitting. |
Depending on what kind of stitch you use and how neat you want it to look you may have to measure where you will punch each hole. It's a lot easier to make a spiral stitch look nice as it's pretty forgiving. However, if you want horizontal stitches or a cross stitch, you may have to measure the location of each hole carefully so that the holes on each side meet up perfectly face to face.
It doesn't take many stitches to hold the sides together. Usually, I punch holes about 2 inches apart on the same side. For this basket I've used buckskin as the lacing material but I've also used rawhide, split roots, or any other kind of cordage with the same success.
Stitch one side first, starting from the bottom. You may have to hold the basket firmly folded for the first couple of stitches so that it doesn't split the bark. After that, it should stay folded on its own. When you're done, lace the other side.
 |
| Splitting a willow stick in half |
You'll need to add a rim to the top so that it maintains its shape. I like using green Osier Dogwood or Willow but I guess any bendy wood would do. Get a length of green willow a bit longer than the outside circumference of the top of your basket and split it in half lengthwise. Start that with a knife but then continue with your hands, pulling both sides with equal force.
Pre-bend each half piece over your knee slowly, making sure it doesn't crack. One piece should be bent with the bark toward the outside of the bend and the other should be bent with the bark toward the inside of the bend.
 |
| Split pieces of willow bent in opposite ways |
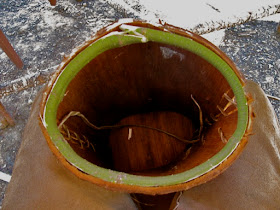 |
| Inside Willow Rim |
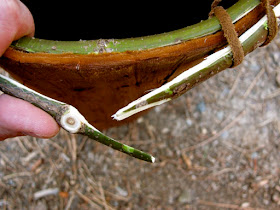
Start with the piece that was bent with the bark toward the inside. This will go inside your basket. Place the willow inside your basket, slowly bending it to fit the inside of your basket. Trim the length of your willow piece if necessary and bevel each end so that one can fit on top of the other, as shown at the top of this picture.
Punch holes just below the willow rim, about 3/4 inch apart, all the way around the basket
Then, fit the other willow piece to the outside of the basket. Again, trim the end if necessary and bevel the ends. Start lacing through the holes around both willow pieces.
 |
| Beveled Outside Rim |
Your basket is now finished! If you want, you can add a strap so that both hands can be free while gathering.
 |
| Finished Basket |
 |
| Healthy tree with an old clean wound |
Thank you for sharing the step by step process. I have been intrigued by these baskets for quite some time now, I will have to try one sometime soon! Loving your site Xavier! You are filled with so much earth wisdom, I love it.
ReplyDeleteYou have one great post after the next and really well detailed instructions. I really liked that you demonstrated your land ethic by returning to check and see the truth behind the possible harvest damage from making the bark basket. +1 subscriber. Thank you.
ReplyDeleteDavid www.natureintoaction.com
your baskets are great, but what about the harm this does to the trees?
ReplyDeleteThis traditional way of making a basket has been done sustainably for at least 5,000 years in my area and you can find such Culturally Modified Trees from many generations ago with the trees still living and being healthy. If you do it correctly it just amounts to the equivalent of a scraped knee for the tree and the wound heals quickly. I always visit the trees I harvest from and make sure they remain healthy.
DeleteHarvesting my own foods, medicines, and tools is the clearest path to sustainability as I can monitor my own impact on the place I call home and adjust my practices accordingly. Compare that to the way things are usually done in our society, in which things are done far away, out of sight, and in unknown conditions, which leaves much room for abuse and destruction.
I have great relationships with the trees I interact with and, as my elders, I am truly grateful and humble for the gifts they offer me, as is taught in traditional ways of living. I can only hope more people take direct responsibility for their actions instead of hiding behind a distant veiled system of exploitation.