 |
| Buckskin Pullover |
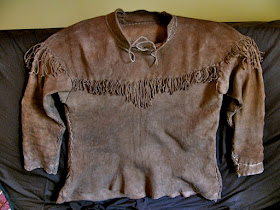
One of the first buckskin garments I made was a pullover. I liked it but, because my hides hadn't been wetted and flattened before cutting out my pattern, it became horribly out of shape, with long narrow sleeves and a huge opening for the head (see more about that on the post How to Wash Buckskin). Needless to say, I didn't like wearing it after that.
But winter is a wonderful time to sit down and fix, modify, or create all sorts of things. And so, without further ado, I present to you my new and improved buckskin pullover.
In this article I'll point out various features that you may want to use for your own buckskin projects, as well as some thoughts on some issues you may run into.
As we saw when making buckskin pants, the safest way to make clothes that fit well is to take apart an article of clothing that fits you well though loosely, and then use that as your pattern. Though that was absolutely critical to do so with pants because of the non-intuitive nature of their pattern, making a pullover is a little more straightforward to make without a pattern, maybe with the exception of fitting the shoulders well, which we talked about when making a simple buckskin shirt.
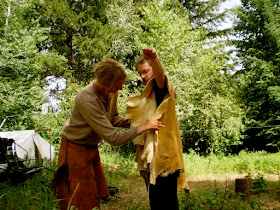
In the present case, I bypassed both issues by 1) enlisting somebody's help at the beginning because it's difficult to make correct measurements when you're not standing straight and motionless, and 2) using a poncho-style design, which got rid of the shoulder seam.
 |
| Help is Helpful! |
 |
| My Pretty Self Posing |
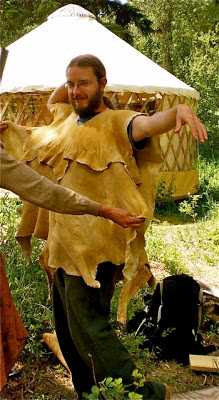
It took four hides to make my shirt, two somewhat heavy ones for the body and two thin ones for the sleeves. The hide I used for the back was long enough that it went from below my butt, over my shoulders, and hung in the front 8 to 10 inches.
I cut a slit in the back hide right where it folded over my shoulder and cut out a small half-circle below that so I could squeeze my head through.
As usual, remember that hides can stretch a lot so it's better to start with a small hole that you can barely squeeze through rather than cut a hole that's too big and will only get bigger.
You can see on this picture the back hide folded over my shoulders and the front hide sewn underneath below it. Note that I didn't cut the back hide below the stitches, which will allow me to make fringes easily.
At that point you can mark where the two hides will come together on the sides. As shown in the two pictures above it's easier to have someone else do it while you're holding your arms horizontally.
It's crucial to consider that buckskin is kinda like your own: it tends to want to cling to you. That's a great thing for your own skin but it can make it incredibly difficult to get out of a buckskin garment that is too tight. Believe me, I've spent quite a few 20-minute anxious periods desperately trying to wriggle out of a buckskin shirt that didn't want to let go of me.
This shirt, which fits me just right, has seams 2.5 inches away from my body at mid-chest on both sides of my body, and it flares out to being 4 inches away from me at the hip.
 |
| Sewn Sleeve |
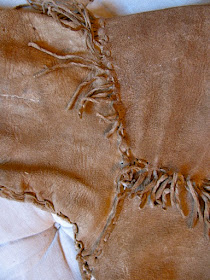
Similarly, the openings for my sleeves are 9.5 inches long from the top of my shoulders, and I'm a fairly small guy. You want to make sure that, when everything is sewn up together, you still have full range of motion.
My sleeves are sewn about 10 inches from the side of my head-opening and follow a slightly curved line down to join where the front and back hides meet.
Don't be tempted to use thick heavy hides for them, as you don't want your movements to be limited by weight and stiffness. I used two doe hides, one for each sleeve. Make sure that they're plenty long, probably covering the whole palm of your hand for now, so that you can make final adjustments and hem them without running out of length.
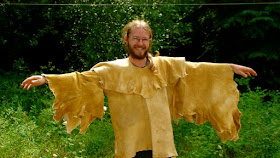 |
| Adding Sleeves to the Buckskin Shirt |
Again, make sure your sleeves are roomy enough that you can get in and out of them easily. Mine are 7 inches wide at the elbow and taper slightly to 5.5 inches at the wrist.
Note that I also didn't cut off the surplus hide over the shoulders. Instead, I kept it as long as possible and used it to make fringes.
Talking about fringes, it's best to cut fringes that are fairly thin and even in width. You'll see that my fringes vary in length, being long in the middle and short on the sides, mainly because that's the way the surplus hide happened to be.
When you first cut your fringes, they'll have "the new fringe look." That is, they won't look good at all. To make them look good, wet them and rub them in your hands, keeping them slightly twisted as they dry. If you can, stretch them a bit before they're completely dry or they could turn very stiff and look weird. You can remedy that later, however, by holding each fringe tightly between your thumb and a dull metal edge and pulling it gently so that it turns soft again.
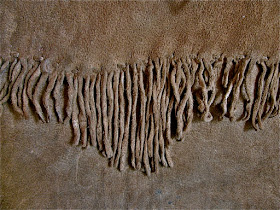 |
| Fringes |
The first thing to consider is that the circumference of the edge closer to your neck is quite a bit smaller than the circumference closer to your shoulders. If you have a large enough piece of hide that's not a problem; you just measure the circumference of your present head opening and you cut that shape out of the hide. Then, you measure what you want your new circumference to be and you cut the appropriate hole from that piece.
However, after working on quite a few buckskin projects, I now literally have hundreds of scrap pieces of all shapes and sizes, and I'm always looking for a way to use them if I can. So to make my collar I ended up using a 3-inch wide piece that just happened to be slightly curved in the opposite way from what would have been ideal.
So of course, after sewing that piece to the pullover, the inside of my collar was flaring way out, gaily flapping around in the wind. Rosalee was not impressed. So I had to reduce the length of the inside of the collar while keeping the outside, which was now sewn anyway, the same length.
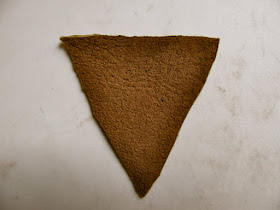 |
| Triangular Piece Cut to Reduce the Outside Circumference |
I managed this by cutting three upside-down triangles from the collar, one from the throat area because I didn't need an overlap there anyway and I wanted to add some lacing to close the opening tighter when needed, and one from each side of the back of the neck.
As this correction was spread across three different locations, the collar itself didn't look stretched or out of shape in any way.
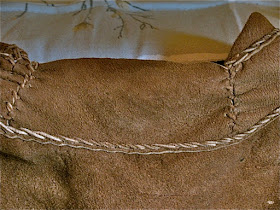 |
| Back of the Neck Fixed after Cutting out the Triangle |
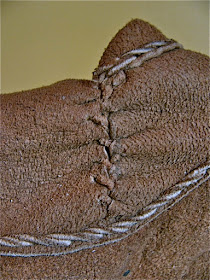 |
| Baseball Stitch |
Then I just used a baseball stitch (which I illustrated in Making a Simple Summer Shirt) to pull the newly opened wound together, and I have to say that it looks pretty good and almost invisible.
And if you like the "french twist" stitch at the bottom of the picture, I explain how to do that in Making Buckskin Pants.
So, all in all, a disastrous start ended pretty well. On that note, I want to say that I started getting discouraged when the collar first looked weird as I felt that I was just fumbling around and potentially messing up the material I had worked very hard to make.
But I think it's important to push ourselves a little bit, as it's the way we learn really. And, in the case of buckskin, it makes a world of difference to have a carefully tailored and comfortable fit that makes us want to wear nothing else, compared to a poorly adjusted garment that we only want to wear at primitive skills gatherings for show and tell.
So I really encourage you to make the effort and adjust your garments until you find the perfect fit, no matter how many times you have to cut and recut, sew and unsew, then cut some more and resew. In the end, the result will be well worth it and you will have learned a whole lot.
Anyway, back to our originally scheduled programming.
Although at first I had the intention to keep the collar free from further alterations, simply letting it fold naturally to the side, I ended up deciding to hem it for a couple of reasons.
First, especially when the hide is fairly thin, unhemmed openings can become wavy, though not necessarily in a bad way if you like the free-flowing look. Hemming prevents them from stretching and getting out of shape, which I definitely wanted to avoid this time. (But also note that it's harder to put your head through a hemmed opening than an unhemmed one if the opening was barely wide enough in the first place).
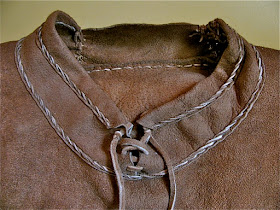 |
| Hemmed Neck |
Secondly, I have fairly sensitive skin so, although the main body of a hide is very soft and comfortable, unhemmed edges can rub my skin raw. The fold from the hem therefore prevents that rubbing from the edge, especially in sensitive areas like the neck as well as the wrists.
Finally, the more I make buckskin clothes, the more I realize that the best way to get in and out of them easily while maintaining a nice fit is to have large openings that you can then close through various mechanisms, like buttons or drawstrings.
Indeed, after adding my collar and hemming it it would have been impossible for me to fit through the opening any more. And so I kept the 2.5 inch slit in the front, which can stretch to 4 inches wide when I pull my head through. But by punching four holes on each side and threading a thick buckskin thong through in a criss-cross pattern, I can easily pull the strings and cinch it tight, thus protecting my neck from the wind.
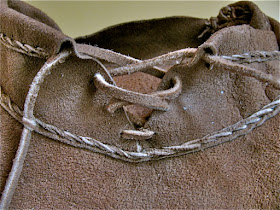 |
| Drawstring to Keep the Opening Closed |
Félicitations :))) bisous de Tarascon !
ReplyDeleteهذا هو رهيبة
ReplyDeletekini ohun iyanu Aaye
ReplyDeleteHello Xavier, thank you for all your posts and videos, an amazing and very detailed help. I used a lot of your advice and I'm now left with three very large hides of soft reindeer buckskin (I'm in Norway). I was wondering if this is the best way to contact you, because I would be very interested in getting inspiration from the pattern you used to sew this pullover. Looks simple enough yet very elegant and functional. If you still have a pattern and willing to share it, I would be extremely grateful if you could please let me know! All the best, Salix.
ReplyDeleteHi Salix,
DeleteThanks for your message. I would have been happy to share a pattern with you. However, I didn't use one. This piece of clothing was pretty much the first one I ever made and, as discussed in the post, I just had my teacher hold the buckskin on my body and make pencil marks for where to cut and sew. My recommendation would be to use an old sweater that fits you well but loosely, take the seams apart, and use that as a pattern. If you have any more questions, feel free to let me know. Take care,
Xavier
Than you for your answer. You have very informative posts. I wondered, when laying a pattern on the sleeves, how do you like to orient them? Do you have the spine of the deer running on top of your arm, or do you lay the sleeve across the width of the buckskin?
DeleteAs a general rule, it's better to have the length of the clothing run along the spine, as it helps the buckskin to keep its shape. There is more stretch across the width of the buckskin so if you lay your pattern that way you end up with extra pouchy knees/elbows.
Delete