If you're lucky enough to have huge salmon skins you may be able to get all the material you need out of one skin. With the average size salmon I get from the store, I used two skins that I will stitch together.
The first step was to cut the skins to size. The finished closed wallet is 4 inches by 5 inches. I cut two rectangles. The one at the top was 3.25 inches by 9 inches. The one at the bottom was 4.25 inches by 9 inches and will wrap around the bottom of the wallet.
I chose to put the two skins together with no overlap with a herring bone stitch because that's all the material I could squeeze out of the two salmon filets but it would probably be better to extend one of the skins by 1/4 inch in height so that they can overlap a bit and be stronger. If you need some instructions on how to do the herring bone or some other stitch, you can watch my videos on sewing with buckskin here. Leave 1/2 inch unstitched on each side for now.
Next, fold the top 1/4 inch of salmon skin on the inside and do a running stitch along the edge, as shown below
There are two large sections inside the wallet for bills and receipts or whatever. For those, I used two rectangles of bark tanned deer hides. I could have used more salmon skins but I didn't want to have more stitching to do and those sections are pretty invisible in the wallet anyway and mainly serve as support for the rest. Just make sure to use the thinnest hides you have to minimize the bulkiness of the final product. Each piece is 5 inches by 8.5 inches.
 |
| Flesh side of the bark-tanned deer pieces |
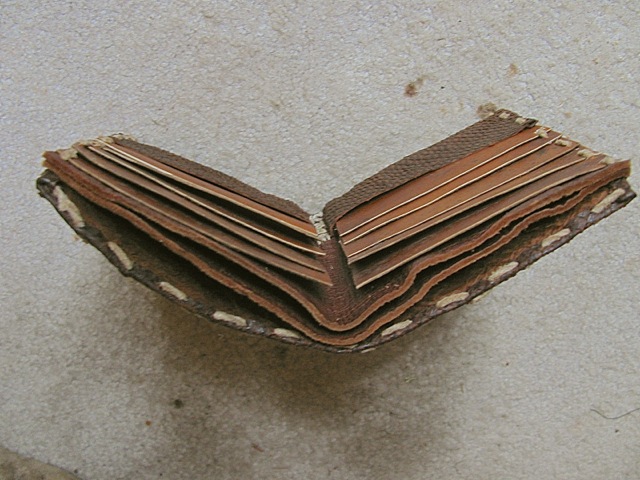
You'll also want to cut out the credit card slots. In a previous buckskin wallet I had used buckskin for those but they were too floppy and make it difficult to slide the credit cards and ID cards in. So this time I used the scrap pieces from the rawhide checkbook covers I made. They're thin and stiff, making them perfect for the job. For 12 slots you'll want to cut out 10 rectangles 2 and 1/8 inches by 3 and 5/8 inches.
Next we'll sew the rawhide pieces onto one of the the bark-tanned deer hide pieces. Start about 1/4 inch from the top, and flush with the short side of the bark tanned piece. Use a simple running stitch 1/4 to 1/2 inch from the bottom of the rawhide to hold it in place. Overlap the next rawhide piece down, leaving 1/2 inch of the piece underneath showing. Repeat until you have your 5 pieces on each side sewn unto the barked-tanned deer hide.
 |
| Rawhide sewn on the outside of the bark-tanned deer piece |
Now, you're going to want to align everything together. So put your salmon skins down, the side with the running stitches facing up. You should be looking at the flesh side of the salmon skins, not the patterned side. Then put the free piece of bark-tanned deer unto the salmon skin, flush with the top, and then the other piece with the rawhide attached to it on top of that. There should be about 1/4 inch of salmon skin on each short side of the deer skin that you need to fold underneath the deer skin to have a stronger edge. You should also have a fairly large piece of salmon skin left at the bottom that will fold over on the inside.
Now you're ready to sew the sides. Starting at the top, punch a hole through all the layers every 3/8 of an inch or so, going down the sides. Don't forget to punch through the bottom flap as well. Then lace everything together with a buckskin thong.
To get rid of the floppiness of the bottom flap of salmon skin it really helps to put a few stitches in the middle/spine of the wallet. You have to make sure to only punch through the salmon skin and the first layer of the deer skin so it's a little challenging to get the thong to go through the holes while working from the inside compartments. If you're extra masochistic you could embroider a short message in thick sinew instead.
When you're done, fold the wallet and put it under some heavy books for a while so that it becomes accustomed to its proper closed shape.
Here's a view from the top that shows the inside compartments.
There you go, another 100% sustainably-made product.


IMPRESSIVE! Do you think you could have tanned it with black tea instead of bark? But in any case kudos on the achievement
ReplyDeleteThank you. Yes, there are tannins in all vegetable matter, though in different quantity, so a lot of things can work!
DeleteThis is fantastic! Amazing!
ReplyDelete